Git, GitHub and hosting websites using GitHub Pages#
To publish your course/website, we will be relying on Github, a web-based platform that provides hosting and storage services for software and data.
Github, or the underlying version control system “Git”, is basically used in every large software project that you can think of. A Github server may be set up on a local machine or network if the access to the hosted software or data should be restricted, but we’ll be using the public Github server, i.e., the web-based version of Git. In essence, this allows us to openly share and for other people to make copies or download our projects, e.g., for collaborative development or issue tracking. It further allows for feedback on our courses or the reporting of possible errors people may have encountered.
The following lesson will contain information on
how to set up your public Github account,
how to set up a project (your course in this case) on GitHub contained in the GitHub “repository,”
by using our template
how to use the version control software “Git” to manage your projects, how to “push” your local course materials to your online repository, and how to host your course website using Github pages.
Goals#
This chapter aims to include the following goals. Do check back here later and you feel like the lesson addressed the stated goals appropriately!
Understand the benefits of using GitHub
Learn how to record changes via git
Learn how to set up and connect local and online (remote) repository
learn how to submit my changes to an online repository
Learn how to host a website using Github pages
Getting started#
Now, getting started with GitHub may feel overwhelming, but for this course, we’ll be learning just the bare minimum.
If you are confused about the language used or want to understand things in greater detail, there are great resources out there for you to explore:
Git operations#
Git can be pretty complex, but we will only be using the following operations; for in-depth explanations in video form, click the contained links:
Forking: Creating a copy of someones repository, that you want to work with. Forks let you make changes to a project without affecting the original repository. For example, you will create an online copy of another repository under your GitHub account.
Cloning: Meaning to create a local copy of an online repository (called “remote”s on your system.
Branching: Meaning to create a copy of a project either online or locally, so that you have an isolated copy where you can work without affecting other branches in a repository. Each repository has one default branch, usually called the “main” branch, and can have multiple other branches.
Committing: A commit is a “snapshot” of your repository at one specific point in time. If you change a repository, you will have to follow up with “committing” the changes to save file changes to your Git repository. This does not mean that your changes will be lost if you, e.g., shut down your system; it just means that the version between a file on your system and the logged version in the GitHub repository does not match.
Pulling: Means simply to update you local repository with the corresponidng online (remote) repository. For, if you or someone else made changes to the online version of a repository, you pull or “download” these changes to your local files this way.
Pushing: Git push is used to upload a local repository’s content to a remote repository. Meaning that you send your locally committed changes to your online repository.
Git Workflow#
A standard Git workflow may look something like this:
2. Clone the repository
3. Make changes
4. Commit changes
5. Push changes
Working with the course template#
To work with our materials, we have to add a minor step, as you don’t want to push your changes to our online repository containing the course template.
Instead, we’ll add the step of “forking” the course template repository to your account:
1. Create a fresh Git Repository for your project#
Let’s put your new GitHub account to use, by creating a new online repository, often referred to as a “remote repo”!
Open Github in your browser and log in
Click on the
+sign in the top right corner and click “New repository”Fill out the repository details:
Give your repository a name and a description
check the box next to “public” to make sure others can find your directory.
This could look something like this:

Check the box
PublicCheck the box
Add a README file
this will initiate your repository with a file that can later be used to display basic information to others viewing your repo.
Choose a license!
You can start out with “None” as this repo is just for testing, but if you plan to use Github for your projects it’s imperative to include one to prevent misuse.
Click the
Create repositorybutton to create your new repository.Now you can add files to your repository by clicking the
Add filebutton by either uploading them or creating a new file.
Congratulations! You are now the proud owner of a GitHub repository. Next, we’ll learn how to connect your local system to your online repos (i.e. “cloning”).
2. Clone the repository#
To start working with your repository, you’ll need to “clone” it to your local computer. This will create a copy of the repository on your computer that you can work with. To clone a repository, click on the green <> Code button and copy the URL you’ve used for your repo.
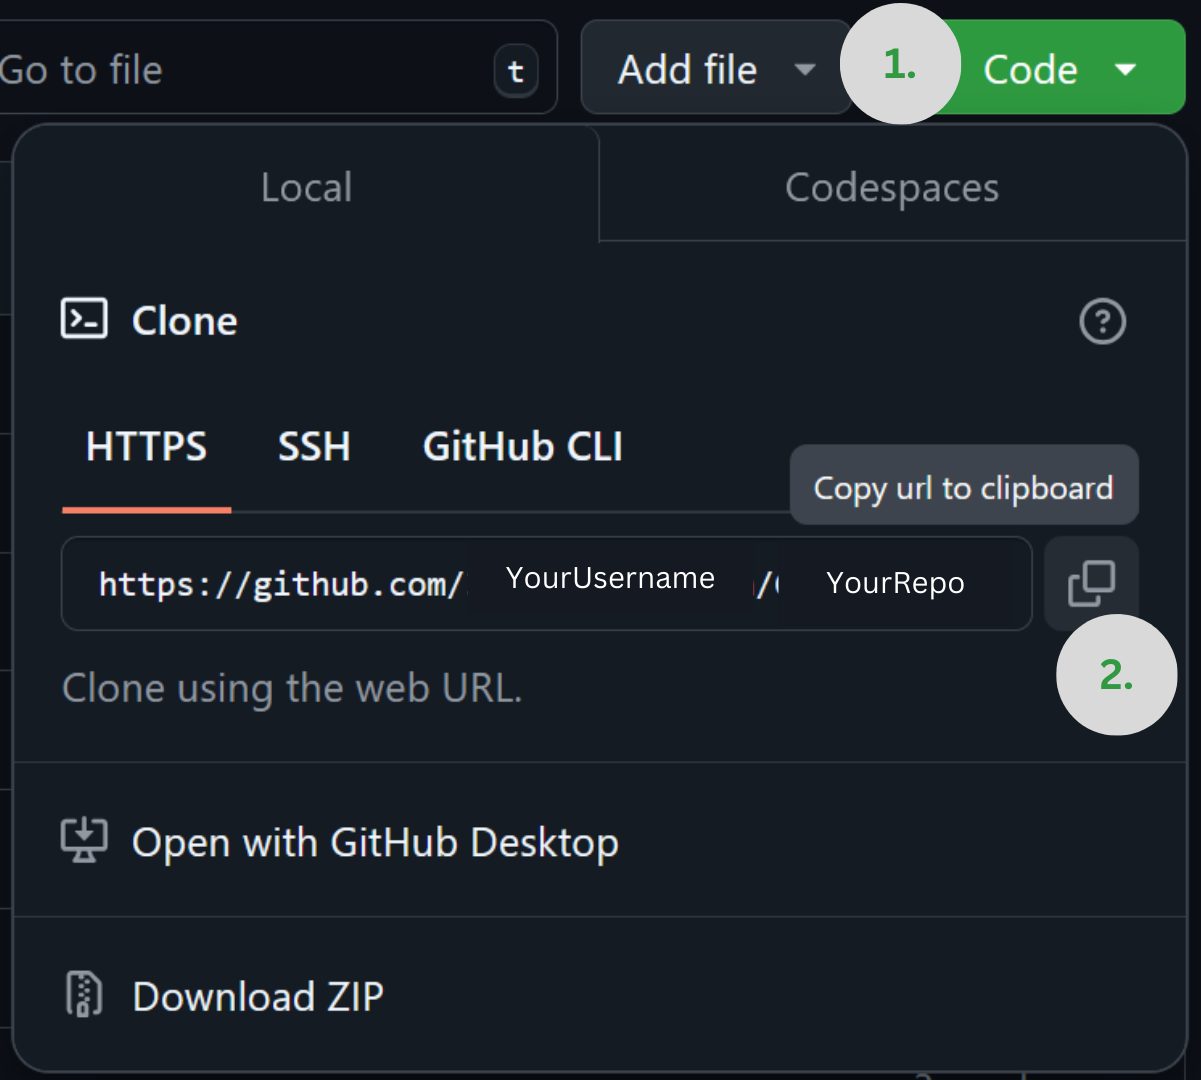
BASH: Open a terminal or command prompt and input the following command: git clone https://github.com/username/repositoryname.Where username is your user name and repository name is the name of your repository.
Gitkraken: Click on file, clone repo and input where the repo should be stored on your system as well as the URL to the repo, i.e., https://github.com/username/repositoryname.
3. Copy our course template#
open our course template repository
click on
<> Codeand then on Download ZIP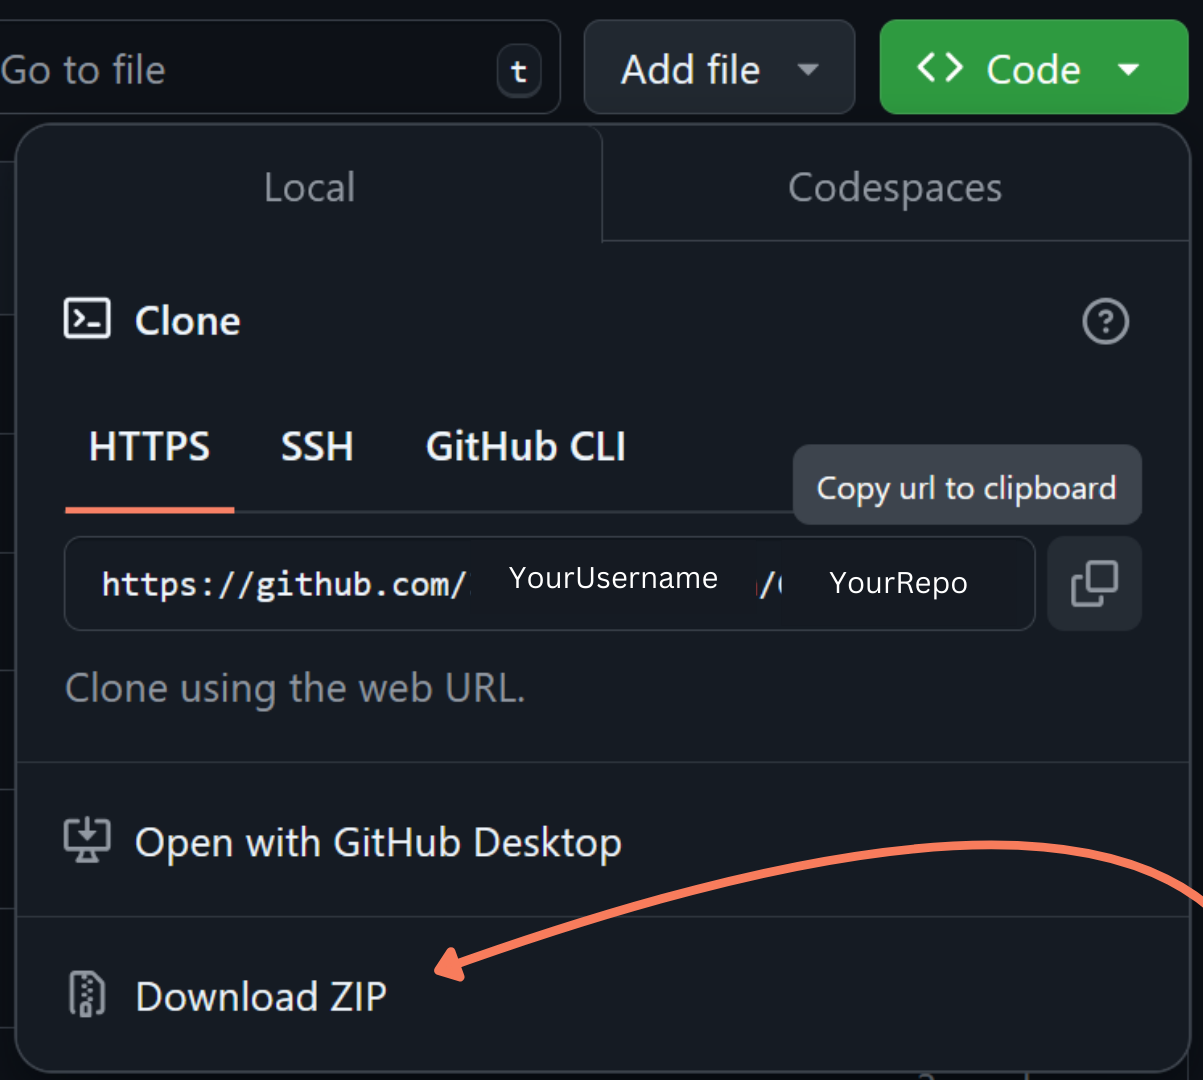
MacOS or Linux:
Extract the contents of the ZIP file in the folder on your local system linked to your GitHub repository.
Windows:
Extract the contents of the ZIP file and then copy the folders (.github and lecture) in the designated remote repository. You then want to replace the README file when asked
4. Make changes#
The course template is structured in the following way

Where:
.github/workflowsfolder: contains the prewritten scripts to automatically create your website every time new content is pushed onlinelecture: contains all our content files and directories, as well as the “toc.yml” and the “config.yml” files, which define the strutcture and functionality of the websiteREADME: a short explanation of your website/courseLICENSE: self-explanatory, stating who and how people are allowed to use or reproduce the content of this reporequirements.txt: contains the necessary requirements for the automatic scripts building the website to run; there is no need to change anything here.
Now, most the things that you’ll be adapting are contained in the content folder lecture, which looks like this.

Where:
content: contains files making up the main content of a course websitegeneral information: contains files providing information, such as the necessary setup, the outline of the course, a code of conduct, etc. The included “index.md” file will be the landing point of the course websiteintroduction: contains files making up the introductory sessions of a coursestatic: contains all the pictures and graphs contained in a course. It’s recommended that should you add new files. e.g., a course logo to this folder.config.yml: Contains the course title, authors, and copyright notice at the footer of the website, which you should change before hosting your website. Further, it contains the specifics for the technical implementations of a course, e.g., whether Jupyter notebooks should be re-run every time the course website is created by the GitHub workflow or, e.g., whether a course incorporated interactive elements.toc.yml: contains information on the structure of the course website.
To get started, exchange the information contained in the ``toc.ymland theconfig.yml` file with your course title, author’s names and affiliation, and so on.
 These are the lines you should adjust within the config file.
Following, you can add Jupyter Notebook or markdown files in e.g., the introduction or content folder according to your needs or simply adapt the already existing files Feel free to check back with the respective lessons on how to modify this template and add files according to your needs:
Content creation
Next, you want to add all your new files to your “toc.yml” file, as described here:
You should further adapt the provided README (to give info on your course) and LICENSE (BSD3) files to your needs.
The README#
To actually display the purpose and, e.g., acknowledgments of your course, you’ll have to adapt the “README.md” file on your public repo. In the template, this looks like this.

and translates to this view at the bottom of your public remote repo
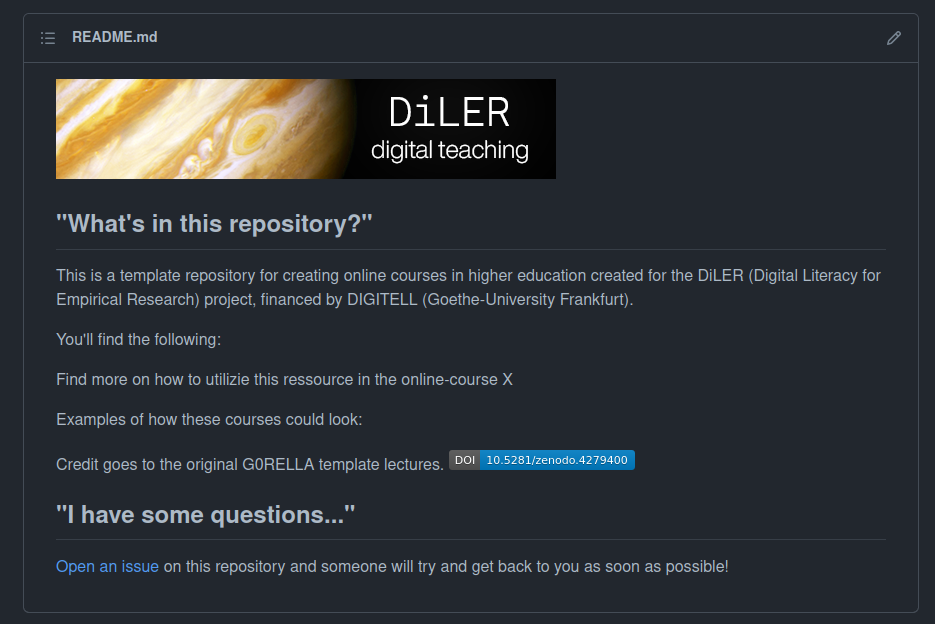
So simply add the name and explanation of your course, your credentials, and, e.g., how others may get in contact with you to the README.md. Please keep the credit included to our original G0RELLA template lectures.
The LICENSE#
You may further change the contained LICENSE file to your liking as long as you respect the stated stipulations.

Redistribution and use in source and binary forms, with or without
modification, are permitted provided that the following conditions are met:

* Redistributions of source code must retain the above copyright notice; this
  list of conditions and the following disclaimer.

* Redistributions in binary form must reproduce the above copyright notice,
  this list of conditions and the following disclaimer in the documentation
  and/or other materials provided with the distribution.

* Neither the name of the copyright holder nor the names of its
  contributors may be used to endorse or promote products derived from
  this software without specific prior written permission.
5. Commit changes#
When you’re done making changes, you’ll need to commit them to the repository. Committing a change records it in the repository’s history and makes it part of the codebase.
BASH:To commit a change, run the following commands in the terminal:
git add .git commit -m "Your commit message."Replace “Your commit message” with a brief description of the changes you made.
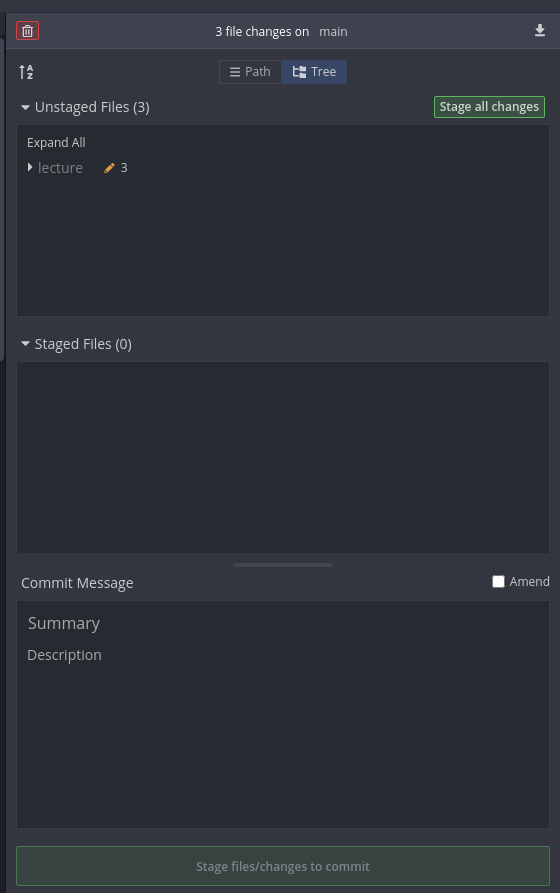
Gitkraken: Click on file, open repo, and select the repo containing your changes. On the left-hand side, you’ll see the “file” overview. Under unstaged files, you can review your changes.
Click the green
stage all changesbutton orright-click on individual
files/foldersand selectstage. The files will be added to thestagedfiles windows. Following:provide a name for your changes (
commit) in the summary field below and add a short but meaningful description of your changeshit the green
Stage changes/changes to commitbutton.
5. Push changes#
Finally, you’ll need to push your changes to your remote repository on GitHub. This will upload your changes to the website so that others can see them.
BASH: To push your changes, run the following command: git push.
Gitkraken: Hit the Push button on the upper center of the window.
Hosting a website using Github pages#
So, to actually turn the course content that you pushed to your remote Github repo into a website, we’ll be using Github Pages.
GitHub Pages allows users to host websites directly from their GitHub repositories, creating a website for their personal portfolio, project documentation, or, in this case, course content. The website is generated directly from the contents of your GitHub repository and is automatically updated whenever changes are pushed to the repository. The chapter structure of your website is dependent on the contents of your _toc.yml, as shown in the Structuring content chapter.
Normally, you’d have to set up a “GitHub-pages-actions” script for the website to be automatically built on push, but the course template already contains everything you need.
If we take a closer look at the .github/workflows folder, we’ll find a file called book.yml. That already contains all the instructions necessary for GitHub to build your book automatically. All we need to do now is change a few of the settings of our online repo.
Setting up your website#
1.Open your repo in your browser and click Settings.

2. Navigate to Code and automation and click on Pages

3. Under Source, select deploy from branch

4. Under Branch: Select branch main and select the /root folder and save (at the bottom)

5.Push a new commit to your repo (e.g., add a line to your README.md or make any change to any file in your GitHub repo)
Checking your workflow#
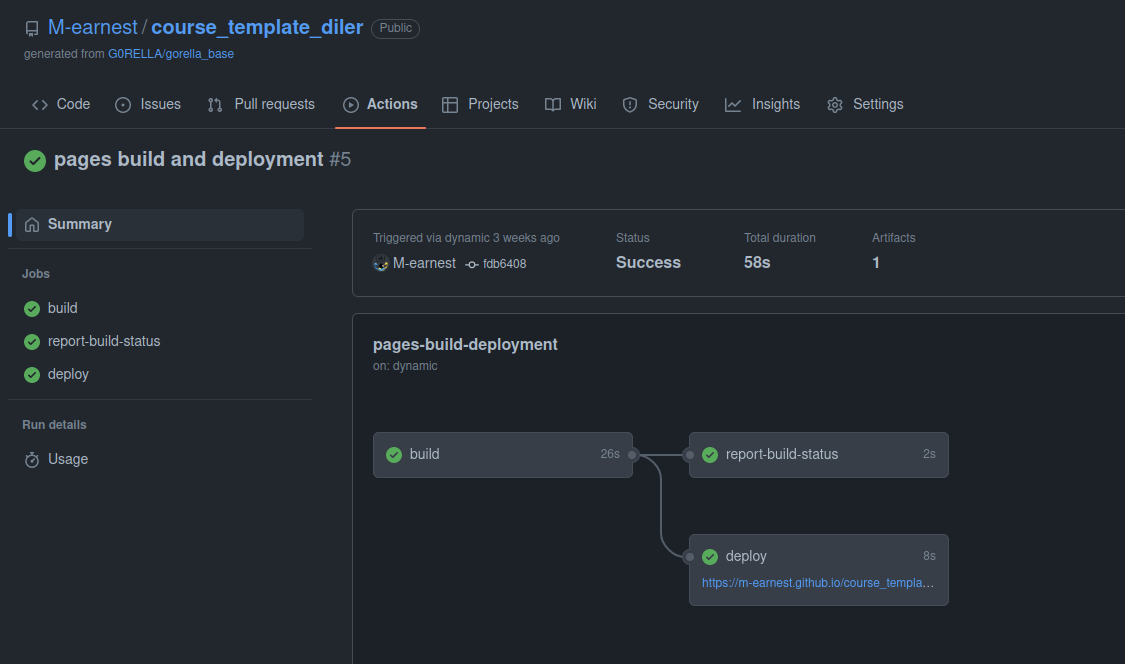
Following, if you now click on Actions at the top of your repo, you should see that a workflow called pages and deployment is running.
Getting your Link#
Once that process has been completed, i.e., it is marked with a green checkmark, head back over to settings -> pages. At the top, under GitHub pages, you should now find a field that looks like this.

Clicking on the displayed link should lead you to your newly built content site. Now, you can simply copy that link and add it to your repos README.md, so people can actually find your website. Done!
Troubleshooting#
If, for whatever reason, the “pages and deployment” workflow fails, it will be marked with a red x instead of a green checkmark.

Clicking on the failed workflow will reveal which process has failed, in this case, the “build” process.

Clicking on the process will reveal a detailed log of which part of the process failed. Debugging this can be quite unintuitive. Therefore, you’ll find common errors and solutions in the chapter Troubleshooting. If the recommended solutions do not work or your error is not mentioned, feel free to contact us either via opening an Issue on the course template repo or e-mail and we’ll try to get back to you ASAP.
Additional ressources#
If you want to start building a website from scratch, change the site theme, or write your pages-action script from scratch, check out the official GitHub pages tutorial.


